
I have been asked a few times, “So, how do you know how to upholster? Is it a hobby or did you work somewhere?” As I reflect back, I suppose I never assumed I couldn’t upholster anything. That seems like a strange thought, but I think it stems from seeing my mother upholster so many things that I just figured it is something that can be done.
One of my first memories of my mom doing some upholstery was after New Years when I was about 10 years old. My mom and dad had gone out somewhere and left all 5 of us in the care of 2 babysitters who were friends. The babysitters had an awesome surprise for us kids: all the fixings for hot fudge sundaes! We promptly indulged in the ice cream feast while sitting on my mom’s cream dinning room chairs. That was the end of the cream fabric. She picked a tasteful 90’s floral to recover the stained chairs- which she covered in upholstery plastic to ward off any additional stray drizzles of hot fudge.
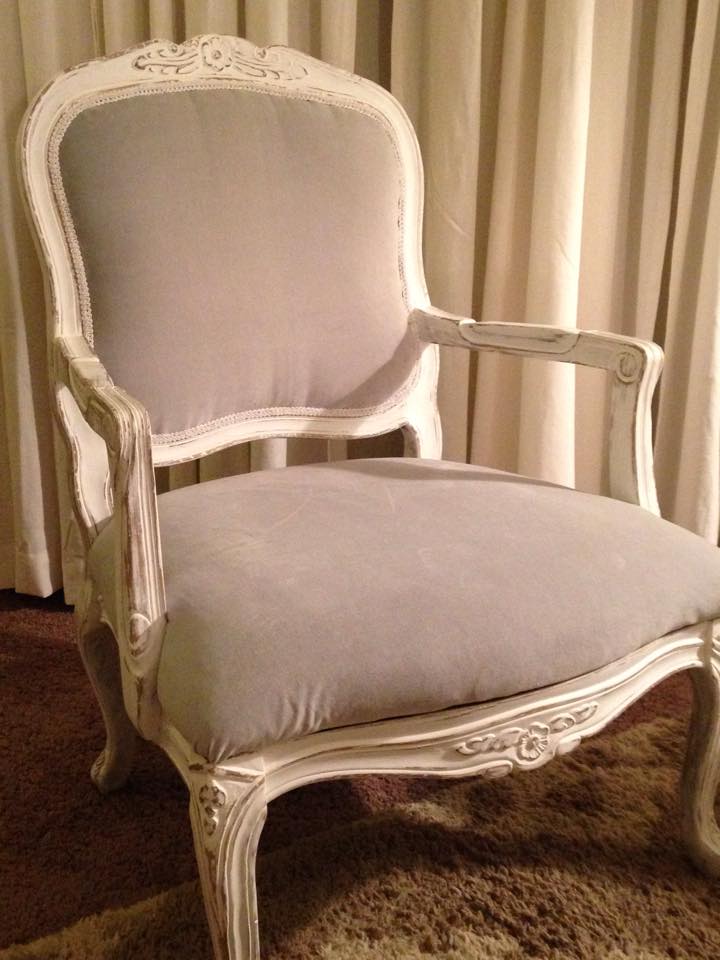
My friend, Emily, asked if I could finish off a pair of French Provincial chairs she had that she did not have time to finish the backs of. I was more then happy to make some extra money while busting out the air compressor. There is something much more satisfying about crafts that use power tools.
![image1[1]](http://www.restfulnook.com/wp-content/uploads/2015/02/image11.jpeg)
My arsenal: small pneumatic staple gun, 1/4 crown 18 gauge 5/8 length staples
, adhesive spray, Beacon’s Magnatac 809 – 4 0z. Glue
, fabric scissors
, and webbing.
![image2[1]](http://www.restfulnook.com/wp-content/uploads/2015/02/image21.jpeg)
The fabric had already been taken off the frame, which made it easy for me to get started. Make sure all staples and nails are removed without damaging the frame. Careful not to leverage your tool on the wood while taking them out.
![image3[1]](http://www.restfulnook.com/wp-content/uploads/2015/02/image31.jpeg)
Start with the fabric that will show through to the backside of the chair first. The idea is to keep the fabric taunt while not creating any unnecessary pull lines. This was difficult with the velvet I was working with on this chair since it pulls easily. The first staple should go at the top center followed by a staple to the right and left about an inch from the center. You must pull the fabric taunt to the right as you staple the right one, and the same with the left. It is a juggling act. Careful not to pull too hard as it will tear a hole where the first staple was.
Note: you really have to use a pneumatic staple gun to get the good finished results with a chair like this. A hand stapler just does not have the force to provide a flush staple with the woodwork.
Move on to pulling the fabric VERY tauntly down and staple the center bottom. Do a staple to the right and left of the bottom, center staple. Next do the right and left sides a bit above the arms. After that, it is up to you to continue to pull the fabric tightly as you staple around the perimeter. Never just go around in a circle as you may end up with you fabric looking uneven. Do a few on one side, then pick a different spot until it is well stapled.
![image4[1]](http://www.restfulnook.com/wp-content/uploads/2015/02/image41.jpeg)
Cut off the extra fabric carefully without gouging the woodwork
![image6[1]](http://www.restfulnook.com/wp-content/uploads/2015/02/image61.jpeg)
Next up is the padding and the webbing. If the padding in the old chair is not dirty or flat, reuse it! If it is either of those things, use it as a pattern to get the right fit. Webbing is a jute material that has been used for structure in chairs for many years. Staple it in the same pattern as the initial fabric: start at the top, do the bottom, then continue to the sides. Make sure it is tight! Cut off the extra webbing.
![image7[1]](http://www.restfulnook.com/wp-content/uploads/2015/02/image71.jpeg)
I decided to add a layer of linen material so the pattern of the webbing would not show through to the top layer of velvet, stapled as I did the first layer of velvet.
![image8[1]](http://www.restfulnook.com/wp-content/uploads/2015/02/image81.jpeg)
The last layer of fabric is the top piece of velvet. I was a bit staple happy which resulted in a few sparks from staples hitting staples. Oops.
![image10[1]](http://www.restfulnook.com/wp-content/uploads/2015/02/image101.jpeg)
Emily decided she wanted gimp for trim, which is a category representing braided trim. Apply it starting a bit below one of the arm rests. Be sure to fold it over so it has a finished look. Use an industrial glue gun
to apply it around the perimeter. I don’t think it is possible for me to do things like this and not burn myself. I hope you are more coordinated then I am since those industrial hot glue guns are painfully hot! Finish off the trim by folding the end part so that it does not show the fray, and you are done!
The seat piece had already been done, so I have no example for that, but the bottom piece is always the easiest.
Some additional pointers:
If you are adding new foam and want to add a layer of batting to make it fluffier, use adhesive spray, it will save you a lot of grief of adjusting the fabric over and over. Be sure to carefully deconstruct any chair you are upholstering and use those pieces as a template. When you cut it out, give yourself a bit more fabric to work with so you can pull on it while stapling. You can always trim it up later. Apply only a thin line of hot glue so it does not ooze out the sides of the trim you decide to use. Nothing says ‘homemade’ like hot glue strings- am I right? Also, be sure to use an appropriate length of staple for your piece and to angle it the right way so that they sink into the wood and are not showing through the back of the chair.
I love being able to find solid old pieces of furniture on craigslist or other for sale sites and make them fabulous again. I am honing my upholstery skills in preparation of designing my own built-ins for my Tiny House and outdoor furniture for my deck. These pieces were a great way to master the details. Thanks Emily!